Posts tonen met het label braid. Alle posts tonen

zondag 10 april 2016

Haar uit je gezicht houden // Keeping hair out of your face

Haar uit je gezicht houden

Veel meisjes komen op een leeftijd waarbij ze hun haar het liefste los hebben. Leuk, maar niet altijd even handig. Denk maar aan gym/-sportlessen of aan dagen met veel wind. Een vlecht is uiteraard een makkelijke optie, maar helaas blijven niet alle vlechten even goed zitten tijdens een sportieve activiteit. Een oplossing is al snel een paardenstaart, maar ook dat is niet altijd handig.

Een andere oplossing kan een knotje zijn. Het haar is uit je gezicht en het blijft meestal erg goed zitten. Wie wil variëren met knotjes, kan er bijvoorbeeld meerdere onder elkaar door als een soort 'hanenkam'. Hieronder zie je twee voorbeelden. Uitleg over deze techniek is terug te vinden in mijn YouTube filmpje Getwiste hanenkam. Het kapsel kan natuurlijk ook met vlechten gedaan worden.

Gevlochten hanenkam met vier knotjes
Braided bunhawk with four buns

Gevlochten, wat gepancakete hanenkam met drie knotjes
Braided, slightly pancaked bunhawk with three buns


Keeping hair out of your face

A lot of girls reach an age where they prefere to wear their hair down. Fun, but not always practical. Think about gym classes or sport events or days with a lot of wind. A braid is of course an easy option, but unfortunately not all braids are 'sports proof'. A solution could be a ponytail, but again it's not always practical.

Another solution is to do a bun. The hair is out of the face and it usually stays in place pretty nicely. Those wishing to do something special, could for example do more than one bun below each other like a bunhawk. Above you can see two examples. Details on this style can be found in my YouTube tutorial Twisted bunhawk. The style could of course be done with braids as well.

zondag 6 maart 2016

Een knoop erin // Knot it up

Een knoop erin

Twee weken geleden schreef ik al een artikel over Geknoopte kapsels, waarin ik als voorbeeld de Geknoopte armband vlecht gaf en de Geknoopte watervalvlecht. Er zijn echter nog meer manieren om een knoop in een kapsel te verwerken.

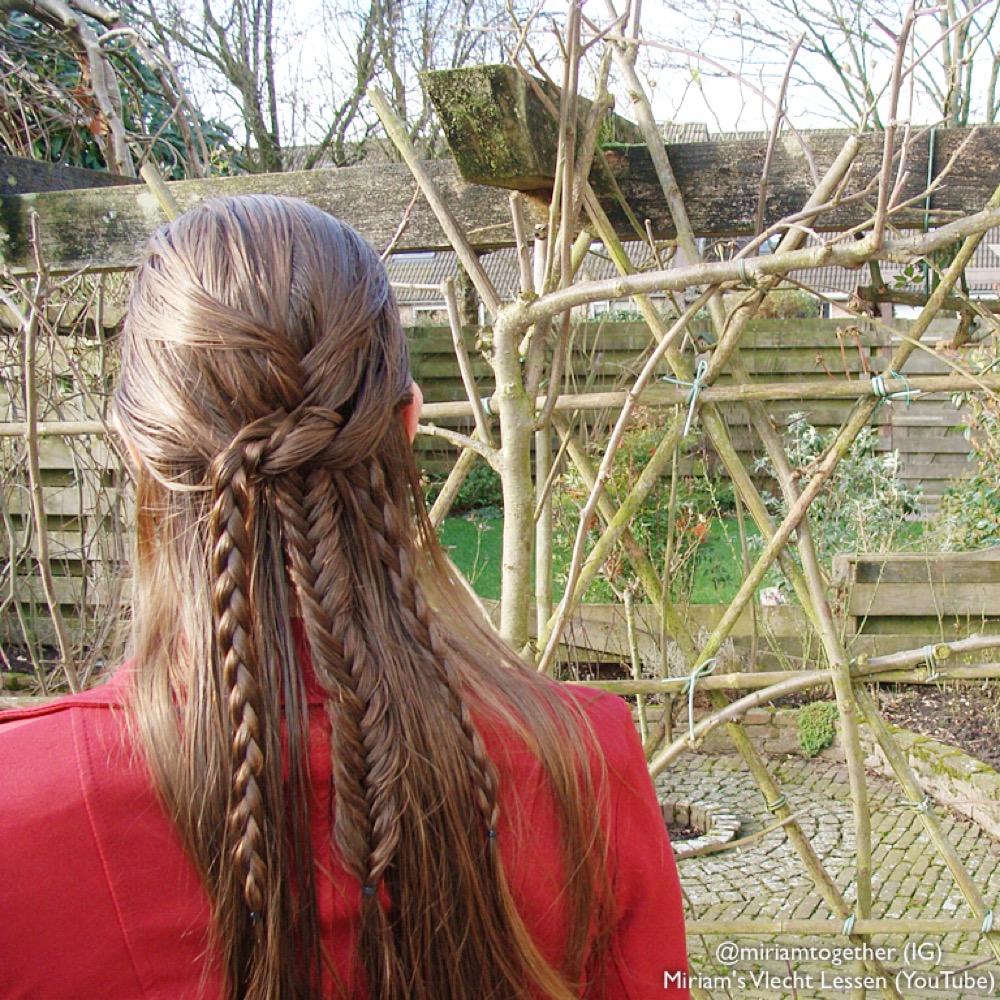
Een makkelijk voorbeeld is het kapsel op de foto. Hiervoor heb ik aan beide kanten van het hoofd een pluk haar gepakt en daar een knoop mee gelegd (alsof je je schoenveters strikt). Vervolgens heb ik in beide uiteindes een gewone vlecht gemaakt. Om het kapsel af te maken, heb ik in het midden nog een vissengraatvlecht gedaan.

Op deze manier kun je dus een simpel kapsel (basisvlechten, vissengraat) weer net iets meer bijzonder maken. Wel geef ik als tip mee: zet de knoop vast met kleine schuifspeldjes om te voorkomen dat hij los gaat! De vlechten hoef je dan verder niet vast te zetten.


Knot it up

Two weeks ago I already wrote an article about Knotted hairstyles, in which I gave the Knotted bracelet braid and the Knotted waterfall braid as examples. But there are more options to use a knot in a hairstyle.

An easy example is the hairstyle in the photo. For this style I've taken a strand of hair on each side of the head and made a knot (like you're tying your shoe laces). Then I did a regular braid in both ends of the knot. To finish off the style, I've done a fishtail braid in the middle.

This is a great way to make an easy hairstyle (regular braids, fishtail) a little more special. I do advise you to use small bobby pins to pin down the knot to prevent it from coming loose! You won't have to pin down the braids then.


dinsdag 22 december 2015

Kerstkapsels // Christmas hairstyles

Kerstkapsels

Over een paar dagen is het zover: dan is het Kerstmis! Voor veel mensen vaak een drukke tijd: zijn alle cadeautjes in huis? Wat komt er op tafel met eten? Wat trek ik aan? En natuurlijk: hoe doe ik mijn haar?

De afgelopen twee weken heb ik op YouTube twee ideeën gegeven: de Watervaltwist met lint en de Op Frozen geïnspireerde vlechten. Aanstaande donderdag zal er ook nog een filmpje online komen met een aantal ideeën voor kerstkapsels.

Wie nog niet genoeg inspiratie heeft, kan eens denken aan het namaken van een ster in het haar (zie foto). Begin met het maken van drie staartjes: eentje bovenop het hoofd, eentje aan de linkerkant boven het oor en eentje aan de rechterkant boven het oor. Verdeel het bovenste staartje in tweeën en maak in elk deel een twist of een vlecht. Breng de linkertwist/-vlecht naar een staartje links onderop het hoofd en breng de rechtertwist/-vlecht naar een staartje rechts onderop het hoofd.
Verdeel dan het linkerstaartje in tweeën en maak alleen in het bovenste gedeelte een twist of vlecht. Breng deze naar het rechterstaartje.
Verdeel nu het rechterstaartje in tweeën, maak in elk deel een twist of vlecht en breng de bovenste twist/vlecht naar het linkerstaartje en de onderste naar het linkerstaartje onderop het hoofd.
Maak nu met het overgebleven losse haar nog een laatste twist/vlecht en breng deze naar het rechterstaartje onderop het hoofd.

Voor wie dit allemaal iets te lastig vindt: een vlecht met rood en/of groen lint of eventueel goud en/of zilver ziet er ook al snel heel feestelijk uit!


Christmas hairstyles

Only a few days until it's actually Christmas! For many people this is often a busy time: are all the presents here? What to do for Christmas dinner? What to wear? And of course: how to do my hair?

The past two weeks I've given two ideas on YouTube: the Ribbon waterfall twist and the Frozen inspired braids. Another tutorial will go live this Thursday with some more ideas for Christmas hairstyles.

Those who still haven't got enough inspiration, could think about doing a star made out of hair (photo). Start by making three ponytails: one on top of the head, one on the left side above the ear and one on the right side above the ear. Divide the top ponytail into two and do a twist or braid in each section. Bring the left twist/braid to a ponytail on the bottom left side of the head and bring the right twist/braid to a ponytail on the bottom right side of the head.
Then divide the left ponytail into two and only do a twist/braid in the top section. Bring this to the right ponytail above the ear.
Now divide the right ponytail above the ear into two, twist or braid each section and bring the top section to the left ponytail above the ear and the bottom section to the bottom left ponytail.
Now do a final twist or braid with the left over loose hair and bring it to the bottom right ponytail.

For those who think this is all too tricky: a braid with red and/or green ribbon or even gold and/or silver looks like a beautiful Christmas braid as well!


zaterdag 28 november 2015

Foto's maken // Taking photos

Foto's maken

Wie een mooie vlechtcreatie heeft gemaakt, zal er zeker een foto van willen maken. Als de foto alleen voor jezelf is, maakt het niet zo veel uit hoe je de foto maakt. Wil je hem echter ook aan anderen laten zien (bijvoorbeeld op Instagram), dan is het leuk als de foto er ook mooi uitziet. Daarom een aantal tips voor het maken van vlechtfoto's:

  • Zorg voor goed licht. Zelf vind ik foto's die buiten gemaakt zijn het mooist. Soms is het echter lastig om buiten foto's te maken (omdat het nog donker is, omdat het regent) en moet je wel binnen fotograferen. Probeer dan de foto dichtbij een raam te maken, zodat je natuurlijk licht hebt.
  • Probeer de vlecht duidelijk in beeld te brengen. Hiermee bedoel ik: let op de details van de vlecht. Het is leuk om de hele vlecht op de foto te krijgen, maar als je daardoor niet goed kunt zien wat voor soort vlecht het is, kun je beter iets inzoomen.
  • Let op je achtergrond. Je kunt er voor kiezen om een neutrale achtergrond te gebruiken, maar het is ook leuk om juist te kiezen voor wat kleur. In de lente en herfst kun je bijvoorbeeld mooie foto's maken met bloemen / bomen op de achtergrond en in de winter met sneeuw.
  • Maak meerdere foto's van je creatie. Zoom iets meer in of uit, maak foto's van verschillende kanten... Op deze manier kun je kijken op welke foto je creatie het best in beeld is.
  • Kun je niet kiezen welke foto je wilt laten zien? Of heb je een creatie gemaakt waarbij de vlecht er van verschillende kanten anders uitziet? Maak dan een collage. Tegenwoordig zijn er verschillende apps waarmee je heel makkelijk een fotocollage kunt maken.
Hieronder een aantal voorbeelden van foto's die ik gemaakt heb (heb laten maken) van mijn vlechtcreaties. Voor nog meer foto's, bekijk mijn Instagram pagina!

Winterse foto in de sneeuw
Wintery photo with snow

Een achtergrond met veel kleur in de lente
A colorful background in spring

Uitkijken over de zee in de zomer
Looking out over the water in summer

De vlecht expres niet in het midden om meer van de herfstachtergrond te laten zien
The braid not in the middle on purpose to show more of the autumn background


Taking photos

Those who have done a beautiful braid creation will definitely want to take a photo of it. If the photo is just for you, it doesn't matter how you take the photo. But if you'd like to show it to others (for example on Instagram), it's nice if the photo looks beautiful as well. That's why I'm giving some tips for taking braid photos:
  • Make sure the light is good. I prefer taking photos outside. Sometimes photographing outside can be difficult (because it's still dark, because it's raining) and you'll have to take your photo inside. Try to make the photo close to a window then, so you have natural light.
  • Try to make sure the braid is visible. This means: pay attention to the details of the braid. It's nice to take a photo of the entire braid from top to bottom, but if you can't see what kind of braid it is, then try to zoom in.
  • Pay attention to the background. You can choose a neutral background, but it's also nice to choose some color in the background. Spring and autumn for example can give you great background with flowers / trees and winter can give you lovely snow photos.
  • Take multiple photos of your creation. Zoom a little more in or out, use different angles... That way you can see in which photo your creation looks best.
  • Can't choose which photo to show? Or did you do a creation where the braid looks different from different angles? Then make a collage. There's plenty of apps these days to easily create a photo collage.
Above you can see some example of the photos I've done of my braid creations. For more photos, check out my Instagram page!


dinsdag 15 september 2015

Basic techniques - level 1

When describing hairstyles I often use the words 'basic techniques'. For me, this means the braiding technique you should master before being able to create fun and more difficult hairstyles. And the fun part is: with just basic techniques you can already create great hairstyles!

Today I'll explain what the level 1 basic techniques are for me, the most important braiding techniques for beginners.

  • Regular braid: this is the 'normal' braid with 3 strands, the braid most people will know / recognize. I strongly advise to master this technique before going any further as this really is the base of all braiding techniques.
  • French braid: another quite known braid. When you've mastered the regular braid, you can try adding in hair. The smaller the pieces you add in, the more beautiful your braid will look.
  • Dutch braid: I've explained the difference between French and Dutch braiding in an earlier blog post. Some people find Dutch braiding more difficult than French braiding, while others find it easier to Dutch braid than to French braid. Again, it's another basic technique I'd advise to master.
  • Lace braid: the name may seem a little strange, but it's just a braid where you add in hair on one side. It's pretty much the same as French and Dutch braiding, only you don't add in hair on both sides. The only thing to remember, is which side you're adding in hair.
  • Twists: for a twist you divide the hair into two strands. First twist both strands to the left and then have them switch places clockwise. Or: twist both strands to the right and then have them switch places counterclockwise. Lucy's style from the movie Prince Caspian is an example of twists.
  • Fishtail: another quite known braid which a lot of people don't know how to do. Start by dividing the hair into two strands and then cross a small strand from the left side over to the right. Then cross a small strand from the right side over to the left. Keep repeating this. Tip: the smaller the strands you cross over, the more your braid will look like a fishtail!
When you've mastered these techniques, you can already create a lot of fun hairstyles by combining techniques. But for those who want more: there are plenty of other techniques! The level 2 basic techniques will be explained in another blog post another time, for now good luck practicing these techniques!

Basic techniques combined: a French braid and a fishtail

dinsdag 8 september 2015

Hairstyles for a week

Yesterday I gave the advise to think of your Monday morning creation before it's actually Monday morning. But did you know that with clever thinking and a little bit of creativity you sometimes can turn 1 basic hairstyle into styles for an entire week? By changing just one little thing you have 7 different hairstyles!

Take the French braid into a 4 strand braid from my YouTube tutorial this week for example. This is already a combination braid - French braiding and braiding with 4 strands - but by changing those two elements a little bit every time, you can create completely different hairstyles!

To help you a little, I'm giving you some suggestions. Of course there's many more options to think of and many more possibilities for combinations, this is just an idea:
* Day 1: do the original style - the French braid into a 4 strand braid;
* Day 2: change the French braid into a Dutch braid. The 4 strand braid remains the same;
* Day 3: keep the original French braid, but finish off with a 3 strand braid instead of a 4 strand braid;
* Day 4: start off with a French twist instead of a French braid. The 4 strands braid remains;
* Day 5: challenge yourself a little by starting off with a French/Dutch 4 strand braid. Then continue with the regular 4 strand braid;
* Day 6: another challenge to try - start with a 5 strand French braid! Of course you could also do a 5 strand Dutch braid;
* Day 7: did you manage the Day 5 challenge? Then challenge yourself even further by starting off with a 4 strand French/Dutch braid with ribbon!

Good luck!

vrijdag 4 september 2015

Combinations

For those of you who have mastered the basic braiding techniques - French braiding, Dutch braiding, fishtails etc. - there's a world of possibilities. You can combine those basic techniques and create hundreds, maybe even thousands of different hairstyles.

What I like best when I wanna do a combination braid, is to just start and see where I'm ending up at. Take today's braid: I started with a headband braid, from which I added the end to a Dutch braid. That Dutch braid I changed into a fishtail. And because I had forgotten a little strand of hair (which you normally don't admit of course... :P) I wrapped a micro braid around the fishtail.

To be honest with you all: these kind of combination braids of course aren't suitable for hasty school mornings! ;)

Have a great weekend, everyone, good luck trying out braiding techniques and creating new hairstyles!

dinsdag 1 september 2015

French braiding <> Dutch braiding

Anyone who's starting to braid more or wants to learn more about braiding, will soon come across the names 'French braiding' and 'Dutch braiding'. Most people will have heard the name French braiding, Dutch braiding is less well-known. What are these two braiding techniques and what's the difference between them?

French braiding
To do a French braid, you add a little bit of hair every time. You start with 3 strands (or more of course, if you're an advanced braider) and every time you braid a stitch, you add a little bit of hair. Keep repeating this until you've added in all of the hair.
This tutorial explains French braiding. Here you will see you have to cross the strands over each other every time. This makes a French braid.

Dutch braiding
To do a Dutch braid, you also add in a little bit of hair every time. Again you will start with 3 strands (or more) and every time you add in some hair. Keep repeating this until you've added in all of the hair.
This tutorial explains Dutch braiding. Here you will see you have to cross the strands under each other everytime. This makes a Dutch braid.

The difference
The difference between the braids is how you cross the strands: over each other (French braiding) or under each other (Dutch braiding). This small difference in technique creates two completely different braids.

French braiding

Dutch braiding

dinsdag 25 augustus 2015

YouTube inspiration

Sometimes you have those days when you don't know what to do with your hair. You wanna create a fun hairstyle, not just a ponytail or a regular braid, but what to create?

When I have one of those days, I love going to Instagram or YouTube. On Instagram you can find hundreds of photos of braids and other hairstyles, the only disadvantage is that you don't always know exactly what kind of braid it is or how the hairstyle has been done. The more experience you have, the easier it is to recognize a braid of course, but not everyone has that experience. YouTube is perfect for them in that case.

On YouTube you can find hundreds of tutorials on all kinds of braids and hairstyles. I have my own YouTube channel, but I also find inspiration on other channels. This triple braided bun for example, inspired by the channel Princess Hairstyles. I had done a triple braided bun myself once before, but this version is just slightly different.

Also subscribe to my YouTube channel for inspiration for your hairstyles or check my Instagram!