Posts tonen met het label kantvlecht. Alle posts tonen

vrijdag 19 augustus 2016

Vakantiekapsels III // Vacation hairstyles III

Vakantiekapsels III

Hierbij opnieuw een aantal vakantiekapsels, deel drie alweer. Bij elke foto staat vermeld waar de foto gemaakt is, dit staat onderstreept. De dik gedrukte tekst legt uit hoe het kapsel gemaakt is. Daarbij staat vaak een link naar een YouTube filmpje met meer uitleg. Wil je nog meer weten over hoe het kapsel gemaakt is (of heb je een andere vraag)? Laat dan even een reactie achter!

Vacation hairstyles III

Again some vacation hairstyles, part three already again. Each photo has listed below where it was taken, this is underlined. The words in italic will explain how the style was done. It often includes a YouTube link to make it easier. If you'd like to know more about the hairstyle (or if you have another question), then feel free to leave a reaction!
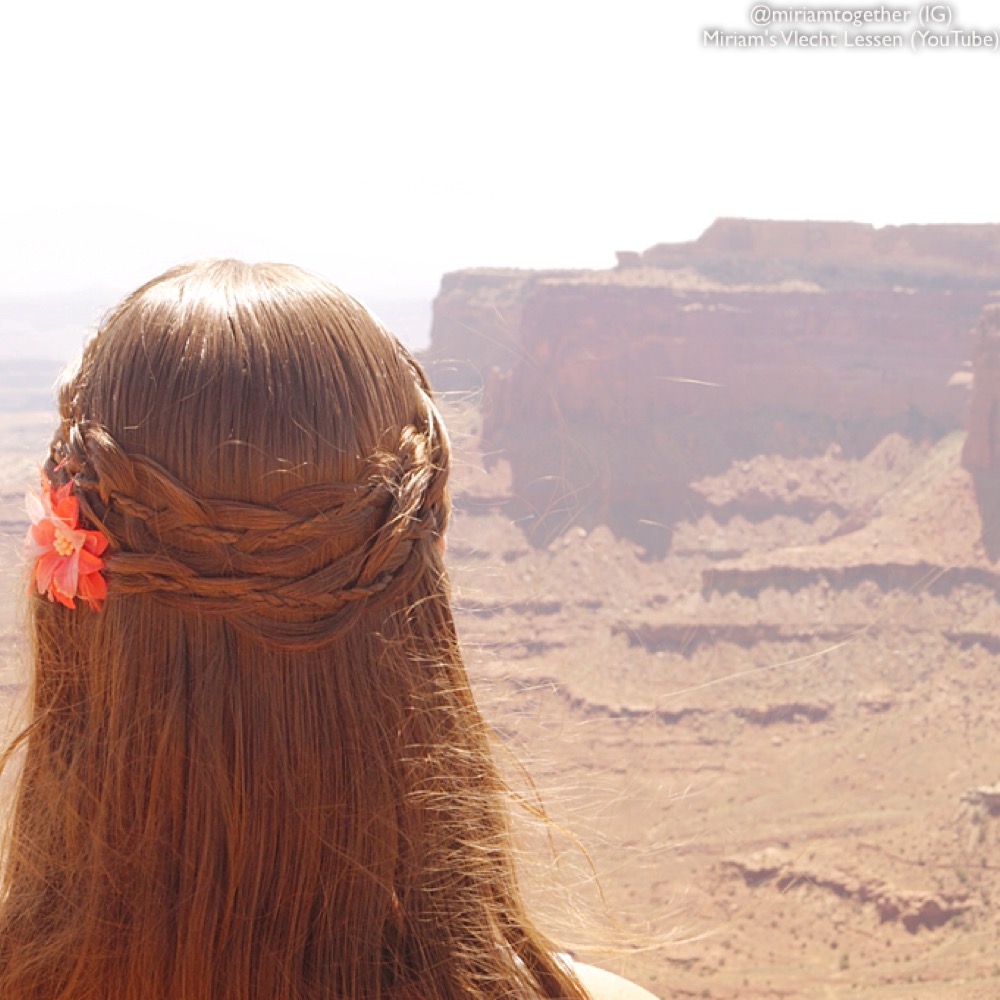
Canyonlands
Maak twee 4 plukken vlechten met microvlechtjes zoals uitgelegd in het filmpje.
Do two 4 strand braids with a microbraid as explained in the tutorial.


Arches National Park
Begin iets achter het linkeroor met het maken van een kantvlecht. Je voegt dus alleen aan de voorkant haar toe. Probeer de vlecht te 'sturen', zodat het een ronde vorm wordt. Ben je bij het rechteroor, vlecht dan nog een klein stukje door en maak dan een staart van het losse haar en het vlechtje. Pak het bovenste gedeelte van de staart en maak hier een gewone vlecht mee. Stop om de paar stukjes en pancake (maak breder) aan één kant. Breng de vlecht dan in de vorm van een bloem en zet vast met schuifspeldjes onder de kantvlecht.
Start just behind the left ear with a lace braid. You'll only add hair from the front. Try to give the braid a good direction, so that it becomes a round shape. When you've reached the right ear, braid on a little further and then make a ponytail from the loose hair and the braid. Take the top section from the ponytail and start a regular braid. Stop every few stitches to pancake the braid on one side. Then turn the braid into the shape of a flower and pin it into place below the lace braid.


Arches  National Park
Zie de uitleg hierboven.
Read the instructions under the above photo.


Capitol Reef
Begin linksboven met het maken van een 4 plukken opvlecht.
Start top left with a 4 strand Dutch braid.


Bryce Canyon
Opnieuw een 4 plukken opvlecht.

Zion National Park
Begin aan de rechterkant met een Geknoopte waterval vlecht. Ga door tot het linkeroor en maak dan een slordig knotje van al het haar, inclusief de waterval vlecht. Maak eventueel af met een bloem of strik.
Start on the right side with a Knotted waterfall braid. Continue until you've reached the left ear and then create a messy bun with all of the hair, including the waterfall braid. Finish off the style with a flower or a bow if you like.


vrijdag 12 augustus 2016

Vacation hairstyles I

The past few weeks I've been on vacation: I went on a beautiful road trip through the west of the United States. Of course I took a lot of hair photos! Below you can find some of those hairstyles. Each photo has listed below where it was taken, this is underlined. The words in italic will explain how the style was done. It often includes a YouTube link to make it easier. If you'd like to know more about the hairstyle (or if you have another question), then feel free to leave a reaction!


Downtown Disney, Anaheim
Part the hair down the middle or just off centre. Do a Dutch braid on both sides of the part (YouTube tutorial). Add hair until you've reached the ear and then continue to braid until the braid reaches the middle of the head. Put an elastic around the braids together and if you like, finish off with a bow or a flower.


Palm Springs, Aerial Tramway
Part just off centre and do a lace braid at the front and another one at the back (the beginning of this style is the same as can be seen in this tutorial). Finish off both braids with a temporary elastic and then do a 5 strand intricate braid with 2 microbraids.


Palm Springs
Part just off centre and do two small ponytails. Divide the top ponytail into 3 strands and the bottom one into 2 strands. Pull the 2 strands in between the 3 strands. The 3 strands are now at the bottom. Add some hair to this and create a new ponytail with this. Keep repeating this pattern until you've adding in most of the hair and then finish off the style with a messy bun.


Joshua Tree National Park
3 strand pull through braid - read the instructions below the photo above to recreate this style.


Scottsdale
Part just off centre and do a Knotted bracelet braid. Then create a ponytail with all of the hair and turn this into a bun. If you like, finish off the style with a flower or a bow.


Scottsdale
Part just off centre and do a lace twist (lace braid tutorial and twist tutorial). Add hair until the ear and then twist on until you've reached the back of the head about halfway. Pin the twist into place with bobby pins and finish off with a flower or a bow if desired.


zondag 10 januari 2016

Vlechten met nat en droog haar // Braiding with wet and dry hair

Vlechten met nat en droog haar

Vaak krijg ik te horen van mensen die gaan vlechten dat de vlecht niet mooi blijft zitten. Het haar pluist te veel of de vlecht wordt niet mooi strak. Het advies dat ik dan geef, is vlechten met nat haar.

Toch is vlechten met nat haar niet altijd even mooi en handig. Daarom een aantal voordelen van vlechten met nat haar en van vlechten met droog haar:

Vlechten met nat haar:

  • De vlecht blijft beter en strakker zitten. Ideaal dus als je een kapsel doet wat de hele dag mooi moet blijven zitten!
  • Je hebt minder last van zogeheten 'fly-aways': kleine plukjes en haartjes die uitsteken. Je vlecht ziet er dus mooier en netter uit.
  • Het haar pluist minder, waardoor het makkelijker te zien is welk haar bij welke pluk hoort. Handig voor als je met veel verschillende plukken vlecht!
  • De vlechttechniek is duidelijker te zien. Denk hierbij bijvoorbeeld aan een kantvlecht of een laddervlecht. Voor deze vlechten werk ik altijd het liefst met nat haar.

Vlechten met droog haar:
  • Omdat de vlecht minder strak is, is het makkelijker en mooier om te pancaken. Je krijgt zo een veel mooiere brede vlecht dan wanneer je pancaket met nat haar (geen aanrader!).
  • De vlecht lijkt wat losser. Dit geeft een wat meer volwassen vlecht. Leuk dus voor wat oudere meisjes en tieners!
  • Het haar is minder glad dan wanneer je vlecht met nat haar, waardoor het soms net iets makkelijker is om vast te houden.
  • Je kunt haarlak gebruiken om de 'fly-aways' weg te werken. Haarlak spuiten op nat haar maakt het haar vaak wat plakkerig.
Er zijn dus genoeg redenen om met nat haar te vlechten, maar ook om met droog haar te vlechten. Mijn advies: kijk per kapsel wat je het fijnst en mooist vinden - vlechten met nat haar of vlechten met droog haar!

Kant vlecht met nat haar
Lace braid with wet hair

4 plukken vlecht met droog haar
4 strand braid with dry hair


Braiding with wet and dry hair

Often I hear beginning braiders complain the braid doesn't stay in well enough. The braid will slip out or they'll have loads of fly aways. The advice I always give, is to braid with wet hair.

Still braiding with wet hair isn't always the solution. That's why I'll give you some reasons to braid with wet hair and to braid with dry hair.

Braiding with wet hair:
  • The braid will stay in better and tighter. Ideal for when you're doing a style that needs to stay in all day!
  • You won't have as many fly aways as when you're braiding with dry hair, so your braid will look more neatly.
  • The hair isn't so frizzy, which makes it easier to see which strand the hair belongs to. Very helpful for when you're braiding with a lot of strands!
  • The braiding technique stands out better. Think about a lace braid here or a ladder braid. For these braids I always prefer working with wet hair.
Braiding with dry hair:
  • Because the braid is less tight, it's easier to pancake. You'll get a much nicer big braid than when you're pancaking wet hair (not something I'd advise!).
  • The braid looks a little looser. This gives it a more grown up look. Great for a little older girls and teenagers!
  • The hair is less slippery than when you're braiding with wet hair, which can make it easier to hold.
  • You can use hairspray to control fly aways. Using hairspray on wet hair can make the hair a little sticky.
As you can see, there's enough reasons to braid with wet hair, but also to braid with dry hair. My advice: choose per hairstyle whether you'd like to braid with wet hair or with dry hair!