Posts tonen met het label inspiration. Alle posts tonen

maandag 16 maart 2020

3D split braid

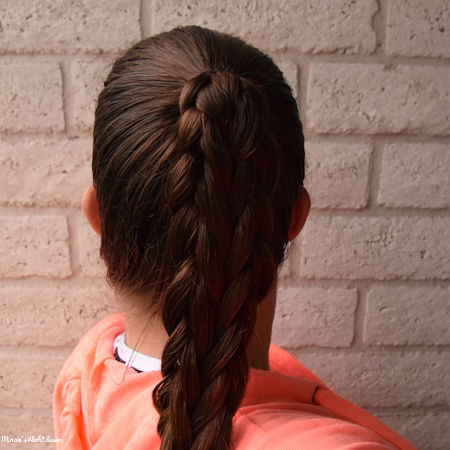
A 3D split braid is a fun and easy variation on the regular 3 strand braid. Before you cross your strand over another, you split the strand in two and then you cross one section over and one section under the next strand. This creates an almost square looking braid.
Up for a challenge by adding in hair? Make sure to check out the video tutorial linked below. Important: always first split the strand and cross it over and under the next strand before adding in hair. This new hair gets added to the middle strand, which is the strand you've just split.

The technique:
3D split braid tutorial (with adding in hair)


Ideas:

The Dutch 3D split braid, as explained in my tutorial.


A variation on the Dutch 3D split braid: Dutch braid a small part, then create a ponytail and braid the hair from this ponytail. Then turn it into a bun.


The regular 3D split braid, started in a ponytail.


The first 3D split braid I've ever done myself, started without a ponytail, with a flower accent braid in Christmas colors.


A variation on the regular 3D split braid: two small 3D split braids, brought together at the back of the head.


zondag 6 oktober 2019

Autumn braids

With the weather changing from sunny to rainy and windy (here in the Netherlands at least) I always start thinking about autumn. For me, autumn is the leaves changing colors and of course Halloween at the end of the month. So why not add that to your braids?

Since Halloween is something different, I won't mention it anymore in this article. Instead, I would like to give you some ideas to add an autumn vibe to your hair.

The first and simplest idea is to add some decoration:

An autumn leave is a fun decoration in your hairstyle! I've done a double waterfall braid here and then added a Dutch braid on each side with the strands from the waterfall braid. I finished off the style with a regular 3 strand braid.


An autumn leave is definitely easy and fun, but it probably won't stay in during a long or active day. A bow is a great alternative:

This pumpkin bow has autumn feeling written all over it! I've done a waterfall braid and then added the waterfall strands to a ladder braid. I then took all of the hair together, tied it into a ponytail and braided that ponytail with a 3 strand braid. I then turned the braid into a bun and added the bow.

Another fun way to add an autumn feeling to your braids is adding ribbon. Orange is usually a real autumn color, but red and yellow can work as well. The fun thing about ribbon braids is that you can use as many or as little strands in your braid as you like: a 3 strand braid can already be turned into a ribbon braid by replacing one of the strands with a ribbon. Add 1 ribbon or 2... the possibilities are almost endless!

Autumn ribbon colors in these flower braids! I've done three 4 strand braids with a single ribbon and then turned them into flowers.

I hope you have some ideas how to give your hairstyles a little extra autumn feeling. If not, here's a few more ideas!

A 6 strand braid with 3 ribbons, one of the ribbons being orange. For me, this hairstyle isn't even that much about autumn, but the background really gives me that feeling.
(Note: the YouTube video link is a 6 strand braid with micro braids, but just replace the micro braids with ribbons for this hairstyle)

If one piece of decoration isn't enough, then why not add two? I've used my pumpkin bow on top of the ponytail, that is an intricate 5 strand braid. I've used three regular strands and two braided sections: each braided section is a 3 strand braid with one of the strands being an orange ribbon.

This background just screams autumn (apart from the parked cars of course! :P). The hairstyle is a 5 strand Dutch ribbon braid. I've stopped adding in hair when I was at the ears, but I did continue the 5 strand ribbon braid all the way down. With the leftover hair, I've done two 3 strand pancaked braids. At the end, I tied all of the braids together with an elastic.


zaterdag 14 september 2019

How to: Loop braid with yarn

Helpful tutorials:
3 strand braid

You'll need:
1 big elastic
Smaller elastics (how many depends on the length of the hair)
Yarn, cut in pieces about twice the length of the hair (the more strands of yarn, the bigger your braids will be - I'd advice at least 10 pieces per 'strand')
If desired, a flower or bow hair clip

How to do this hairstyle?
  1. Comb all of the hair back and tie it into a ponytail.
  2. Take the pieces of yarn and pull them through the elastic, so that there's an equal amount of yarn pieces on each side of the ponytail. Pull on the pieces until both sides are the same length.
  3. Take the yarn on one side and divide it into two strands.
  4. Take a small strand of hair on the same side and start a regular 3 strand braid. Continue braiding until the end of the hair / the yarn and finish off with a small elastic.
  5. Repeat steps 3 and 4 on the other side.
  6. Cross the left yarn braid over the ponytail. Then cross the right yarn braid over the left braid. Do not pull them too tight, the idea is to create loops.
  7. Now take a small strand of hair from the ponytail below the section where the yarn braids cross each other. Put this strand over the crossed yarn braids and then pull it through the middle of the ponytail to the back. Then put an elastic around the hair (so NOT around the yarn braids).
  8. If you like, you can pull a little on the yarn braids to create better loops.
  9. Repeat steps 6 through 8 until you've reached the end of the hair / yarn braids.
  10. If you like, you can add a flower or bow clip as decoration to your ponytail.
Good luck!


zondag 14 juli 2019

Chain link braid

This braid may seem complicated, but it's actually a combination of 2 twists (rope braids). Important is to remember how you're doing your twist as both twists need to be done the same way. Then you twist the two twists around each other. Keep your direction in mind here. If you've created your twists by twisting the strands to the right and then crossing the right strand over the left strand, then you first need to crosss your left twist over the right over. The other way around: if you've created your twists by twisting the strands to the left and then crossing the left strand over the right one, then now cross your right twists over the left one.
By twisting in the opposite way, your braid will start to look like a 'chain' - hence the name 'chain link braid'.

The technique:
Chain link braid tutorial (from CuteGirlsHairstyles)

Ideas:

A high ponytail with the chain link braid.


A side chain link braid.


A chain link braid also makes a cute accent braid.


The chain link braid was used here to create a bun by turning the braid around the elastic that created the starting ponytail and then pinning the braid into place.

A stacked braid made from a French braid and a chain link braid.


A fun variation: the chain link braid as accent braid with a Dutch braid, used together for a corset braid.


zondag 26 mei 2019

5 strand split braid

The regular 3D split braid is a super easy variation on the 3 strand braid. The 5 strand version isn't that much more difficult, it's mostly a matter of knowing how to do the technique.
You start by dividing the hair into 5 strands, I'm calling them (from the left to the right) A, B, C, D, E. Split strand A (the far left strand) into two and cross one section over strand B and one section under strand B. Then add your two sections together and cross them together over strand C. Then split strand E into two and cross one section over strand D and one section under strand D. Then add your two sections together and cross them over the middle strand. Keep repeating this.
In short: the outer strand always goes over and under and then over.
You can also add in hair, so you get a Dutch braided version of the braid. Pay attention, though: always split the outer strand first and cross it over and under. Then add hair to the strand you've just split and now brought together again. Using the letters from before: split strand A, cross the sections over and under strand B, grab new hair, cross it under strand B and add it to strand A. Then cross strand A, with the new hair, over strand C.

The technique:
5 strand split braid tutorial (From Flettemamma - English subtitles)

Ideas:


A high ponytail with the 5 strand split braid


A corset braid combined with a 5 strand split braid


Dutch 3D split braid continuing into a 5 strand split braid


The Dutch version of the 5 strand split braid


A Dutch version with half of the hair


A headband braid version of the Dutch 5 strand split braid, combined with a Dutch fishtail


zondag 26 augustus 2018

How to: Knotted bracelet braid accents with messy bun


How to: Knotted bracelet braid accents with messy bun

Helpful tutorials:
Knotted bracelet braid tutorial
Messy bun tutorial (messy bun starts at 2.46)

You'll need:
Two big elastics
2 small elastics
Bobbypins
A flower or a bow if desired

How to do this hairstyle?
  1. Start off by brushing and combing the hair. Then create a side part.
  2. Take a small section of hair on the side with the most hair, next to the part.
  3. Start a knotted bracelet braid with this section: divide the section into three strands, take the left strand and cross it over the middle strand (make sure to keep a small loop on the left side) and then cross the right strand over this left strand, under the middle strand and then pull it through the loop on the left side. Tighten the knot, make sure to hold the middle strand as well while you tighten the knot.
  4. Continue the knotted bracelet braid until the braid reaches the nape of the neck. Finish off with a small elastic.
  5. Repeat steps 3 and 4 with a new small section of hair from behind your first braid.
  6. Take all of the hair and tie it into a ponytail.
  7. Turn the ponytail into a messy bun. There's several ways to do this, for this style I've wrapped all of the hair around the elastic before putting another elastic around it. I've used a few bobbypins to secure loose ends, but I've also left out a lot of strand for an even more playful look.
  8. If you like, you can add a flower or a bow.
Good luck!

Front view of this hairstyle

zaterdag 11 augustus 2018

Travel braids

The summer months are always ideal months to travel. Travelling means a lot of planning, though: where are you going to go, how are you going to get there, where are you going to sleep, what are you going to bring, but most importantly (at least for me!) - how are you going to wear your hair?

For me, there's two kinds of travel braids:

  • the braid you want to wear because you're going to go some place nice and you're hoping for a beautiful photo;
  • the braid you want to wear because you've got a long day of travelling and you still want to look presentable when you arrive.

My vacations usually have both braids: the second braid for the flights to and from the destination and the first braid for the other days. I do always plan the first braids as I don't want to waste my time on the destination thinking about what kind of braid I want to do. If I have to think about it once I'm there, I usually end up doing a braid I've done a million times before and I just don't want to do that when I've got a chance of a special background. This 4 strand slide up braid made out of braids, for example, is a braid I had planned before we went on vacation and one I could never have thought of in the morning. It's actually really easy (you create 4 braids, you make a 4 strand braid out of those 4 braids and then you slide it up), but yet I love how intricate it looks.

For the second type of braids (the 'have to stay in all day' braids) I usually go to simple styles. That way you can easily do the braid again if it doesn't look the way you want anymore. Great styles would be a side ponytail with a rope braid or a 4 strand braid. I never go for a ponytail in the back as I find it's not comfortable when you want to lean back in your seat. That's why I never wear buns either when I have to travel a long time.
Other great styles would be two French or Dutch braids or, if you've got more time in the morning before you travel, a fishtail braid. I love fishtail braids for travelling for my hair as I tend to have quite a bit of flyaways and I find them staying in better with a fishtail braid.

Travel photo from 2016: the fishtail braid on the left was for a long day in the car and the French fishtail braid on the right was for the flight from Los Angeles to Amsterdam.

Another great travel braid is a pull through braid. The elastics help to keep the braid in all day, better than a regular braid. For my recent flight from Amsterdam to Vancouver I did this side pull through braid and when I arrived in Vancouver I did of course have some flyaways, but it still looked nice.


Of course now I'm curious if you have any favorite travel braids. What kind of braids do you usually do during your vacation? Easy styles because you want to have time to enjoy your day? Or new braids as you've got time to try them out now? And what are your favorite braids for long flights / car rides? I'd love to hear from you, so please leave a reply below this post or on Facebook!


zaterdag 2 juni 2018

30 days new braids

June is always a special month on Instagram for the braiding community - it's the 30 days new braids month!

30 days new braids is a challenge for braiders to try and do as many different braiding techniques as possible. Each day of the month June is about a certain braiding technique. It's up to you to create a hairstyle using this technique. Of course there's loads of possibilities, because with a technique as (for example) French braiding, you can do a thousand different hairstyles.

The challenge is not so much about trying to join in every day, but about challenging yourself to try new braiding techniques. The challenge of course has the standard French and Dutch braid, but also techniques like space buns, crown braids, feathered braids and heart braids. The idea behind the challenge is to get you out of your comfort zone: as you braid more often, you often also find yourself doing the same kind of braid. 30 days new braids tries to show you there's so many more techniques than the ones you already do so often.

If you'd like to know more about the 30 days new braids challenge: Jenni Petänen is hosting the challenge this year on Instagram. She has taken over the challenge from Hair by Lori, who has loads of information and ideas on her website.

If you want to see my styles for this year's 30 days new braids challenge, then please head over to my Instagram account. The collage below is from two years ago, when I joined in every day.


zondag 13 mei 2018

Double Chinese staircase braid - Dutch version

Lately I've been totally in love with the Dutch version of the double Chinese staircase braid. The what?, I can hear you say. Yep, it's a long name, but it's also a really beautiful braid. It has a very unique look and the technique is actually really easy. The downside? The braid can take a while to do...

But let's recap first of all! The technique began as a regular Chinese staircase braid, which can be done loosely (as shown in the photo) or tighter. It's basically a knotted braid, where you take a small strand of hair, wrap it around the rest of the hair and then pull it through the opening where your strand began. You then add another small strand of hair to your first one and continue the braid. Nothing all too complicated yet.

Loose version of the Chinese staircase braid

Next, there was the reversed Chinese staircase braid. Instead of wrapping the small strand over the rest of the hair you now wrap it around by first going under the rest of the hair. Again, nothing too complicated yet.

Tight version of the reversed Chinese staircase braid

The third version of this braid is the one where it got a little more complicated: the double Chinese staircase braid. Instead of taking a strand of hair from the side you now have to take a strand from the middle and divide the rest of the hair into two sections. By going around the right and left section alternately you get a completely new and unique braid. 

Double Chinese staircase braid

After this third version of the braid it got kinda quiet around the Chinese staircase braid. But then PrettyHairIsFun did a tutorial on the French braided version of the Chinese staircase braid and of course one had to be created for the double Chinese staircase braid. I immediately fell in love with it as - like I said before - it's such a beautiful braid. I first did a version ending a ponytail, but I also did a half up version, which I also love. 

Dutch version of the double Chinese staircase braid, ending in a ponytail

Half up version of the Dutch double Chinese staircase braid


Please let me know what you think about this braid, I'd love to know! And if you have done this braid yourself and would like to share it with me, you can do so on the Facebook page of Miriam's Vlecht Lessen - I love seeing your styles!

Oh, and of course if you haven't tried out the braid yet, here are some helpful tutorials!

Good luck and have fun with this braid!


zaterdag 24 maart 2018

Headband braids inspiration

Headband braids are great hairstyles on school mornings as they are quick and often easy - a French braid, a Dutch braid or a lace braid. A twist braided headband is also a great idea and for those of you with longer hair, a simple 3 strand braid wrapped around the head (photo below) is perfect as well.

But why not try using a different technique for your headband braids? I have a tutorial on the 5 strand headband braid and you could also use ribbons in your headband braid. A little while I tried out a completely different technique - a 4 strand fishtail headband braid. I really love how this headband braid turned out as it's so different from any other headband braid and it doesn't even take that long (once you've mastered the 4 strand fishtail of course). If you'd like to practice the 4 strand fishtail braid first of all, there's a tutorial on my YouTube channel Miriam's Vlecht Lessen.

Simple 3 strand headband braid for longer hair


4 strand fishtail headband braid


Good luck trying out different techniques! I'd love to know which techniques you've tried - please leave a comment below telling me which technique you've used!


zondag 14 januari 2018

Inspiration idea: stacked braid variation

On my YouTube channel Miriam's Vlecht Lessen you can find a tutorial on the stacked braid. In this tutorial I'm using the Dutch braid and rope twist as braids for the stacked braid, but of course there's a lot of other possibilities. Almost every technique is suitable for the stacked braid. For the bottom braid I'd suggest choosing braids you can easily pancake (such as Dutch braids or pull through braids), while the top braid should be a smaller braid (like a fishtail braid or a regular 3 strand braid).

For this variation I've used a Dutch braid as bottom braid and a round 3D braid as top braid. Have you got fun variation tips? Then let them know in a comment below!


maandag 13 februari 2017

Ideeën voor Valentijnsdag // Ideas for Valentine's Day

Ideeën voor Valentijnsdag

Met Valentijnsdag voor de deur wordt het hoog tijd om te beslissen hoe je je haar gaat doen natuurlijk. Vorige week heb je bij Technieken & ideeën al kunnen lezen over hartvlechten en hieronder vind je nog een aantal ideeën.

Fijne Valentijnsdag!

Ideas for Valentine's Day

With Valentine's Day just a day away it's of course time to decide on a hairstyle. Last week you've been able to read about heart braids in Techniques & ideas and below you can find some more ideas!

Happy Valentine's Day!

Twee watervalvlechten met een hartje, gedaan volgens de techniek uitgelegd in mijn filmpje, maar dan met gewone vlechten in plaats van vissengraten.
~*~
Two waterfall braids with a heart, done using the technique as explained in my tutorial, only done with regular braids instead of fishtails.

Ook een leuke hartvlecht: maak met een kam een scheiding in de vorm van een hart!
~*~
Also a fun heart braid: use a comb to create a part that's shaped like a heart!

Dit schattige hartje is zelfs leuk voor grotere meiden!
~*~
This adorable little heart is even fun for older girls!

Tijd over? Probeer dan dit dubbele hart van vissengraatvlechten. Gebaseerd op de techniek uitgelegd in mijn filmpje.
~*~
Got some time? Then try this double heart made out of fishtails. Based on the technique explained in my tutorial.

Als je het groene lint vervangt door rood of roze is ook dit hartje heel leuk voor Valentijnsdag!
~*~
If you replace the green ribbon by red or pink this heart is also a great style for Valentine's Day!


zaterdag 24 december 2016

Fijne feestdagen en een gelukkig nieuwjaar! // Happy holidays and happy new year!

Fijne feestdagen en een gelukkig nieuwjaar!

Graag wil ik iedereen heel erg fijne feestdagen toewensen. Of je het nu gaat vieren met familie, vrienden of alleen - ik wens iedereen een ontzettend fijn tijd toe... met natuurlijk prachtige kerstkapsels! Hieronder kun je nog wat inspiratie vinden voor als je nog niet weet wat je met je haar gaat doen de komende tijd.

Ook wil ik iedereen alvast het allerbeste wensen voor 2017. Dat het maar een mooi jaar mag worden met veel geluk, goede gezondheid en natuurlijk heel veel leuke vlechten en kapsels!

Tot volgend jaar!

Happy holidays and happy new year!

I'd like to wish everyone happy holidays. Whether you're celebrating it with family, friends or alone - I hope everyone has a wonderful time... with of course beautiful hairstyles! Below you can find some inspiration for if you don't know what to do with your hair yet the next couple of days.

I'd also like to wish everyone the very best for 2017. Let's hope it'll be a great year with loads of happiness, a good health and of course many many beautiful braids and hairstyles!

Ritsvlecht met rood en groen lint
~*~
Suspended infinity braid with green and red ribbon

Kerstkransvlecht (4 plukken vlecht met lint)
~*~
Christmas wreath braid (4 strand braid with ribbon)

'Loony' vlecht van 2 linten en 1 pluk haar
~*~
Loony braid with 2 ribbons and 1 strand of hair

~*~


Ondersteboven kerstboomvlecht van elastiekjes
~*~
Upside down Christmas tree braid from elastics


zondag 3 april 2016

Simpele vlechten // Easy braids

Simpele vlechten

Variëren met vlechten is ontzettend leuk. Invlechten met 4 of 5 plukken, een vissengraatvlecht, een twist... Maar waarom zou je niet eens een keer variëren met alleen simpele vlechten?

Met simpele vlechten bedoel ik de echte basisvlechten: vlechten met 3 plukken. Natuurlijk kun je in- en opvlechten, maar ook met alleen vlechten zonder haar toe te voegen kun je leuke kapsels maken. Hieronder vind je een aantal ideeën en op YouTube is bijvoorbeeld Phoebe's vlechtjes een voorbeeld van een kapsel met alleen simpele vlechten (klik op de titel om het filmpje te bekijken)!

Weef de vlechtjes door elkaar voor een leuk patroon
Weave the braids through each other for a fun pattern

Pancake 2 kanten van de vlecht voor een speciaal resultaat
Pancake 2 sides of the braid for a special result

Een hartje van vlechtjes
A heart made out of braids

Nog een hartje, maar nu met gekruiste vlechten
Another heart braid, but now with crossed braids


Easy braids

It's fun to do a lot of different braids. French braiding or Dutch braiding with 4 or 5 strands, a fishtail braid, a twist... But why not create different hairstyles using just easy braids?

Easy braids for me are regular 3 strand braids, the basic braids. Of course you can do French or Dutch braids, but even without adding in hair you can create fun hairstyles. Above you can find some ideas and on YouTube the tutorial Phoebe's braids is an example as well (click on the title to watch the tutorial)!