Posts tonen met het label 3D braid. Alle posts tonen

maandag 16 maart 2020

3D split braid

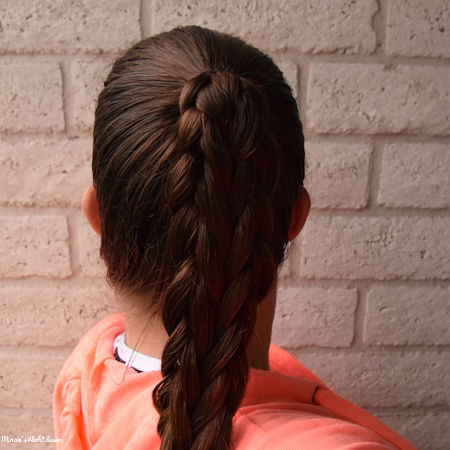
A 3D split braid is a fun and easy variation on the regular 3 strand braid. Before you cross your strand over another, you split the strand in two and then you cross one section over and one section under the next strand. This creates an almost square looking braid.
Up for a challenge by adding in hair? Make sure to check out the video tutorial linked below. Important: always first split the strand and cross it over and under the next strand before adding in hair. This new hair gets added to the middle strand, which is the strand you've just split.

The technique:
3D split braid tutorial (with adding in hair)


Ideas:

The Dutch 3D split braid, as explained in my tutorial.


A variation on the Dutch 3D split braid: Dutch braid a small part, then create a ponytail and braid the hair from this ponytail. Then turn it into a bun.


The regular 3D split braid, started in a ponytail.


The first 3D split braid I've ever done myself, started without a ponytail, with a flower accent braid in Christmas colors.


A variation on the regular 3D split braid: two small 3D split braids, brought together at the back of the head.


zaterdag 11 januari 2020

How to: Dutch 3D round braid with 4 strand woven braid

Helpful tutorials:
Dutch 3D round braid

You'll need:
1 elastic
1 ribbon
1 small elastic
Topsy tail (if you wish to hide the elastic with hair - an alternative is to use a flower clip or bow)

How to do this hairstyle?
  1. Attach the ribbon to the big elastic.
  2. Part the hair off centre.
  3. Take a small section of hair on the side with the most hair and divide this into four equal parts.
  4. Start a Dutch 3D round braid with these four strands. Angel your braid towards the ear.
  5. Continue until you've added in all of the hair. Finish on the side of the head.
  6. Use your elastic with the ribbon attached to it to finish off your Dutch 3D round braid.
  7. Take your topsy tail and put it point down through the elastic. Take a small strand of hair, wrap it around the elastic and then put the end of the strand through the opening of the topsy tail. Pull the topsy tail down. You've now done a hair wrapped ponytail, your elastic is hidden. You could also choose to hide your elastic with a flower clip or a bow. If you want to do that, skip this step and add the flower clip or bow once you've finished braiding.
  8. Divide the hair from your ponytail into three equal strands. The ribbon is your fourth strands. The start position of the ribbon doesn't matter for the braid.
  9. Now do a 4 strand woven braid: take the far left strand and cross it over the strand next to it, under the next strand and over the last strand (where 'strand' is written, you can also read 'ribbon').
  10. Repeat step 9 all the way down the hair. Finish off with a small elastic.
Good luck!

zondag 26 mei 2019

5 strand split braid

The regular 3D split braid is a super easy variation on the 3 strand braid. The 5 strand version isn't that much more difficult, it's mostly a matter of knowing how to do the technique.
You start by dividing the hair into 5 strands, I'm calling them (from the left to the right) A, B, C, D, E. Split strand A (the far left strand) into two and cross one section over strand B and one section under strand B. Then add your two sections together and cross them together over strand C. Then split strand E into two and cross one section over strand D and one section under strand D. Then add your two sections together and cross them over the middle strand. Keep repeating this.
In short: the outer strand always goes over and under and then over.
You can also add in hair, so you get a Dutch braided version of the braid. Pay attention, though: always split the outer strand first and cross it over and under. Then add hair to the strand you've just split and now brought together again. Using the letters from before: split strand A, cross the sections over and under strand B, grab new hair, cross it under strand B and add it to strand A. Then cross strand A, with the new hair, over strand C.

The technique:
5 strand split braid tutorial (From Flettemamma - English subtitles)

Ideas:


A high ponytail with the 5 strand split braid


A corset braid combined with a 5 strand split braid


A Dutch 3D split braid continuing into a 5 strand split braid


The Dutch version of the 5 strand split braid


A Dutch version with half of the hair


A headband braid version of the Dutch 5 strand split braid, combined with a Dutch fishtail


zaterdag 9 februari 2019

How to: Ladder braid with 3D split braid

Helpful tutorials:
Waterfall braid
3 strand braid
3D split braid

You'll need:
1 big elastic
1 small elastic
2 temporary elastic
Topsy tail

How to do this hairstyle?
  1. Part the hair just off center.
  2. Take a small strand of hair from the side with the most hair and divide it into three. Do a waterfall braid with this hair.
  3. When you've braided until just behind the ear, stop doing a waterfall braid. Continue a little further as a regular braid and then finish off with a temporary elastic.
  4. Now take a new section of hair below the waterfall braid. Divide this section into two - left and right.
  5. Take your first waterfall strand and cross it over strand Left from step 4. You now have three strands to braid with again.
  6. Cross strand Right from step 4 over the middle strand.
  7. Add the next waterfall strand to the left strand of your braid and cross them together over the middle strand of the braid.
  8. Add some hair to the right strand of your braid (be careful not to take any waterfall strands!) and cross the strand over the middle on.
  9. Repeat steps 7 and 8 until you've added in all of the waterfall strands. Try to keep your braid close to the waterfall braid, so it will look like the two braids are actually 1 big braid.
  10. When you've added in all of the waterfall strands, braid a little further without adding in hair. Finish off with a temporary elastic.
  11. Take all of the hair together, including the braids, and put an elastic around it. You can now remove the temporary elastics from your braids.
  12. Take your topsy tail and put it just behind the elastic. Take a small strand of hair from your ponytail, wrap it twice or three times around the elastic and then put the end through the eye of the topsy tail. Pull the topsy tail down.
  13. Divide the hair from your ponytail into three strands and do a 3D split braid: before crossing a strand over, split it into two and cross the top part over the middle strand and the bottom part under.
  14. Continue until the end of the hair and finish off with an elastic.
Good luck!


vrijdag 26 augustus 2016

Vakantiekapsels V // Vacation hairstyles V

Vakantiekapsels V

Dit is het één na laatste deel van mijn vakantiekapsels. Bij elke foto staat vermeld waar de foto gemaakt is, dit staat onderstreept. De dik gedrukte tekst legt uit hoe het kapsel gemaakt is. Daarbij staat vaak een link naar een YouTube filmpje met meer uitleg. Wil je nog meer weten over hoe het kapsel gemaakt is (of heb je een andere vraag)? Laat dan even een reactie achter!

Vacation hairstyles V

This is almost the last part of my vacation hairstyles, only 1 to go. Each photo has listed below where it was taken, this is underlined. The words in italic will explain how the style was done. It often includes a YouTube link to make it easier. If you'd like to know more about the hairstyle (or if you have another question), then feel free to leave a reaction!

Yosemite National Park
Verdeel het haar in drie delen: één deel aan de rechterkant van het hoofd en twee delen aan de achterkant. Maak vervolgens in elk deel een Opvlecht. Breng als laatste de drie vlechten bij elkaar en maak er een Gevlochten vlecht van.
Divide the hair into three parts: one part on the right side of the head and two parts at the back. Do a Dutch braid in each part. Then bring the three braids together and turn them into a Braided braid.


Yosemite National Park
Zie de uitleg hierboven om dit kapsel na te maken.
Read the explanation above to recreate this style.

San Francisco, Lombard Street

San Francisco, Alcatraz

San Francisco, Golden Gate Bridge
Net als hierboven: doe een Ingevlochten 3D splitvlecht.
Just like above: do a Dutch 3D split braid.


woensdag 7 oktober 2015

3D headband braid

Headband braids (braids done close to the forehead) are always fun. They're good to keep the hair out of your face and they're always great to combine with other braids.

Like with almost all other braids you have a lot of options with headband braids. You could do a French braided headband braid, a Dutch braided headband braid (where you cross the strands under), a lace braided headband braid (where you only add in hair on one side), a twisted headband braid, a headband braid with 5 strands... or a 3D headband braid.

For the headband braid in the photo I've used the 3D round braid technique. For this braid you'll start with 4 strands. To make it easy, I'll call them (from the left to the right) A-B-C-D. First cross strand A under strand B and C and then twist it around strand C. Then cross strand D under strand C and B and then twist it around strand B. Now add some hair to strand A, cross the strand under B and C and twist it around C. Then add some hair to strand D, cross it under strand C and B and then twist it around B. Keep repeating this.

Good luck! Do you want to share photos of your 3D headband braid? Then post them on Instagram with #mvlhair or on the Facebook page of Miriam's Vlecht Lessen!